Best Lighting for Photography Studio: Guide to Stunning Results
- Bryan Wilks
- Jan 25
- 14 min read

If you're trying to figure out the best lighting for your photography studio, let’s get one thing straight: there's no single "best" light. The real answer depends entirely on what you're shooting.
That said, if you’re just starting out, a powerful, bi-color continuous LED light paired with a large softbox is an incredibly versatile choice. It gives you that what-you-see-is-what-you-get advantage, which is a lifesaver for dialing in your look for both photos and video. But when you need to freeze motion or completely dominate the ambient light in a room, studio strobes are still the undisputed champion for professional photographers.
Understanding Your Core Lighting Options

Choosing your studio lights is like picking the right tool for a job. You wouldn't use a hammer to turn a screw, right? In the same way, the blindingly fast pop of a strobe is perfect for capturing a dancer mid-leap, while the steady glow of an LED is what you need to film a podcast interview in a dedicated space like Freeform House's Booth.
Getting a handle on the main types of lights is the first real step toward building a kit that works for you, not against you.
The Three Main Types of Studio Lights
When you boil it all down, studio lighting really comes in three main flavors. Each one offers a different mix of power, convenience, and portability, making them suited for different kinds of shoots.
Here are the heavy hitters you’ll run into:
Studio Strobes (Flash): These are the workhorses. Strobes deliver a massive, instantaneous burst of light that freezes action and produces incredibly sharp, detailed images. If you’re shooting portraits, fashion, or products, this is your go-to.
Continuous LED Lights: Just like the name says, these lights stay on. This is a huge advantage because you can see exactly how the light and shadows are hitting your subject in real-time. They’re also a non-negotiable for any kind of video work.
Speedlights: Think of these as the small, portable flashes that can sit on top of your camera or be used off-camera with a trigger. They aren't as powerful as a big studio strobe, but their tiny size makes them perfect for shooting on location or adding a little pop of light to a bigger setup.
To make things even clearer, here’s a quick breakdown of how these lights stack up against each other.
Quick Guide to Studio Lighting Types
This table gives you a snapshot of which light to reach for in different situations.
Light Type | Best For | Key Advantage | Consideration |
|---|---|---|---|
Studio Strobe | Portraits, fashion, commercial product photography, freezing fast action. | Massive power output for crisp, clean images and overpowering ambient light. | You can't see the effect until you take the shot (unless using a modeling lamp). |
Continuous LED | Video production, interviews, live streaming, beginner-friendly photography. | "What you see is what you get" makes learning and setup intuitive. | Less power for the price compared to strobes; can be less effective for freezing motion. |
Speedlight | On-location shoots (events, weddings), adding accent or hair lights. | Highly portable, versatile, and can be used on or off-camera. | The least powerful option; relies on batteries that can drain quickly. |
Ultimately, many photographers end up with a mix of these tools in their kit. You might use a big strobe as your main light, an LED panel to fill in some shadows for a video clip, and a speedlight tucked in the back to add a subtle highlight. It’s all about having the right tool for the vision in your head.
Strobes vs. Continuous Lights: What to Know
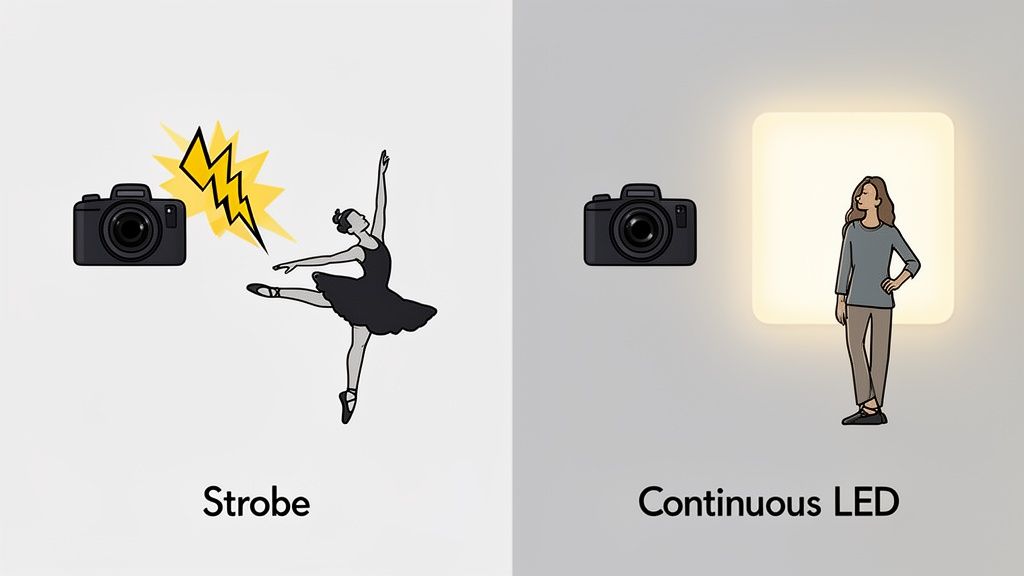
The first major decision you'll make in studio lighting boils down to one question: strobes or continuous lights? It's a fundamental choice, and the best way to think about it is with a simple analogy. A strobe is like a lightning strike—a powerful, instantaneous flash. A continuous light, on the other hand, is like the sun—a constant, unwavering source of light.
Neither is better than the other, but they are built for entirely different jobs. Getting this core difference down is the key to picking the right gear for your studio and your creative goals. It's a decision that will shape your workflow, the subjects you can shoot, and the final vibe of your images.
The Power and Precision of Strobes
When it comes to raw power, studio strobes (often just called flash units) are the undisputed champs. They pump out an incredible amount of light in a tiny fraction of a second, and that gives photographers two huge advantages.
First, that sheer power lets you completely overpower any other light in the room. This is how you get those clean, professional shots without weird color casts from ceiling lights or sunlight contamination from a window. Second, the incredibly short flash duration freezes motion with absolute clarity.
This makes strobes the go-to tool for:
Dynamic Portraiture: If you want to capture a dancer's leap in a studio like The Rise at Freeform House, you need the motion-stopping power of a strobe. It’s non-negotiable.
Fashion Photography: Getting those tack-sharp details in moving fabric and on models is what separates amateur work from pro fashion shots.
Commercial Product Shots: Think splashing liquids, falling coffee beans, or anything that moves too fast for the human eye. Strobes nail those moments perfectly.
The main learning curve with strobes is that you can’t see what the light is doing until after you take the shot. Most have a small, low-power "modeling light" to help you aim, but dialing in the final exposure is a classic process of shooting, checking, and adjusting.
The Intuitive Nature of Continuous Lights
Continuous lights, which are almost always LEDs in a modern studio, do exactly what their name implies: they stay on. This one simple fact makes them incredibly intuitive, especially for anyone new to studio lighting. There's no guesswork.
What you see is what you get (WYSIWYG). This real-time feedback is perfect for learning how light wraps around a subject and how shadows fall. And because they are always on, continuous lights are the only option for videography, giving you smooth, flicker-free footage.
In the pro world, LED continuous lights have become the king of the hill for hybrid photo/video studios, now commanding a massive 55% share of the global studio lighting market. Their energy efficiency and true-to-life color rendering are perfect for long sessions where you need consistent, accurate results. You can dig into the numbers in this in-depth market research report.
Choosing between strobes and continuous lights isn't about which is "better" overall, but which is better for the specific image you want to create. Power and motion-freezing precision define strobes, while intuitive, video-ready consistency defines continuous lights.
Shaping Light with Modifiers
A powerful light source is only half the story. The real artistry begins when you learn how to shape that light. A bare, unmodified flash bulb creates harsh, unflattering light with sharp, defined shadows—perfect for a high-drama look, but often unforgiving for portraits or product shots.
This is where light modifiers come into play. Think of your light source as a fire hose; on its own, it’s a direct, powerful stream. Modifiers are the different nozzles you attach to turn that stream into a gentle, wide spray or a focused, precise jet. These tools give you control over the quality, size, and direction of your light, fundamentally changing the mood and feel of your image.
Understanding Soft Light vs. Hard Light
The core idea behind every modifier is its relationship with shadows. It all boils down to one simple principle: the larger the light source is relative to your subject, the softer the light will be.
Hard Light: This comes from a small, direct source, like a bare bulb. It creates deep, crisp shadows and high contrast. Think dramatic, edgy, and intense.
Soft Light: This comes from a large, diffused source, like a big softbox. It wraps around the subject, creating gentle, feathered shadows and a more flattering, forgiving look that’s ideal for portraits.
With the right modifier, you can transform a single strobe from a hard, intense source into a soft, beautiful one.
Essential Light Modifiers and Their Uses
Walk into any professional studio, and you’ll see an array of modifiers hanging around. Each one has a specific job, designed to sculpt light in its own unique way. Whether you're in a versatile space like The Rise loft studio at Freeform House or your own home setup, knowing these tools is essential.
Softboxes and OctaboxesThese are the absolute workhorses of studio photography. A softbox is just what it sounds like: a box (square or rectangular) that attaches to your light. It’s lined with a reflective material and covered with a white diffusion panel. An octabox is simply an eight-sided version.
Because they create a large, soft light source, octaboxes are a favorite among portrait photographers. They produce beautiful, natural-looking, rounded catchlights in a subject's eyes that just feel right.
Beauty DishesA beauty dish creates a unique quality of light that’s somewhere between hard and soft. It gives you a focused, punchy light that’s still forgiving, accentuating bone structure without being harsh. This makes it a go-to for fashion, beauty, and glamour portraits.
UmbrellasUmbrellas are simple, affordable, and incredibly effective. They come in two main flavors:
Shoot-through umbrellas: You point the light through the white, translucent material. This creates a broad, soft light source that spreads out quite a bit.
Reflective umbrellas: You point the light away from the subject and into the umbrella, which bounces a broader, more controlled light back onto your scene.
Grids and SnootsThese modifiers aren't about softening light—they're about controlling it.
A grid is a honeycomb-like insert that attaches to a softbox or dish. It stops the light from spilling everywhere and creates a more focused, directional beam. A snoot is a cone-shaped tube that narrows the light into a tight, circular spot, perfect for creating a dramatic hair light or highlighting a specific detail on a product.
Building Your First Lighting Setups
Knowing your gear is one thing, but knowing how to use it to craft a specific mood? That’s where the real magic begins. Making the jump from theory to practice can feel like a big leap, but you only need a few foundational lighting recipes to start producing professional-level images.
These setups are absolute workhorses—versatile, effective, and perfect for creators working in a dynamic space like a shared studio. Let's break down three essential scenarios you can master and then adapt for pretty much any project you can dream up. We'll kick things off with the industry gold standard and then see what’s possible with just a single light.
The Classic Three-Point Lighting Setup
The three-point lighting setup is the bedrock of professional portrait and video work for a reason. It’s designed to perfectly sculpt a subject with light, create a real sense of depth, and make them pop right off the background for a clean, dimensional look. Each light has a very specific job to do.
Key Light: This is your main light, your MVP. Placed at roughly a 45-degree angle to your subject, it provides the primary illumination and carves out the initial shadows.
Fill Light: Positioned on the opposite side of the camera, this light’s job is to "fill in" the shadows created by the key light. You'll want to set its power lower—the goal is to soften the shadows, not blast them away entirely.
Rim Light (or Hair Light): This one goes behind the subject. It traces their outline, creating a subtle halo that visually separates them from the background. It’s the secret ingredient for that final professional polish.
This setup is the undisputed champion for corporate headshots, interviews, and any shoot that demands a clean, flattering, and expertly lit subject. While it's absolutely crucial for video, understanding this principle is just as vital for photographers. And if you're looking to get your audio on the same professional level, you can explore more in our guide on how to set up podcast equipment for studio-quality sound.
The whole journey from a harsh, bare bulb to beautifully sculpted light is all about deliberate control and modification.
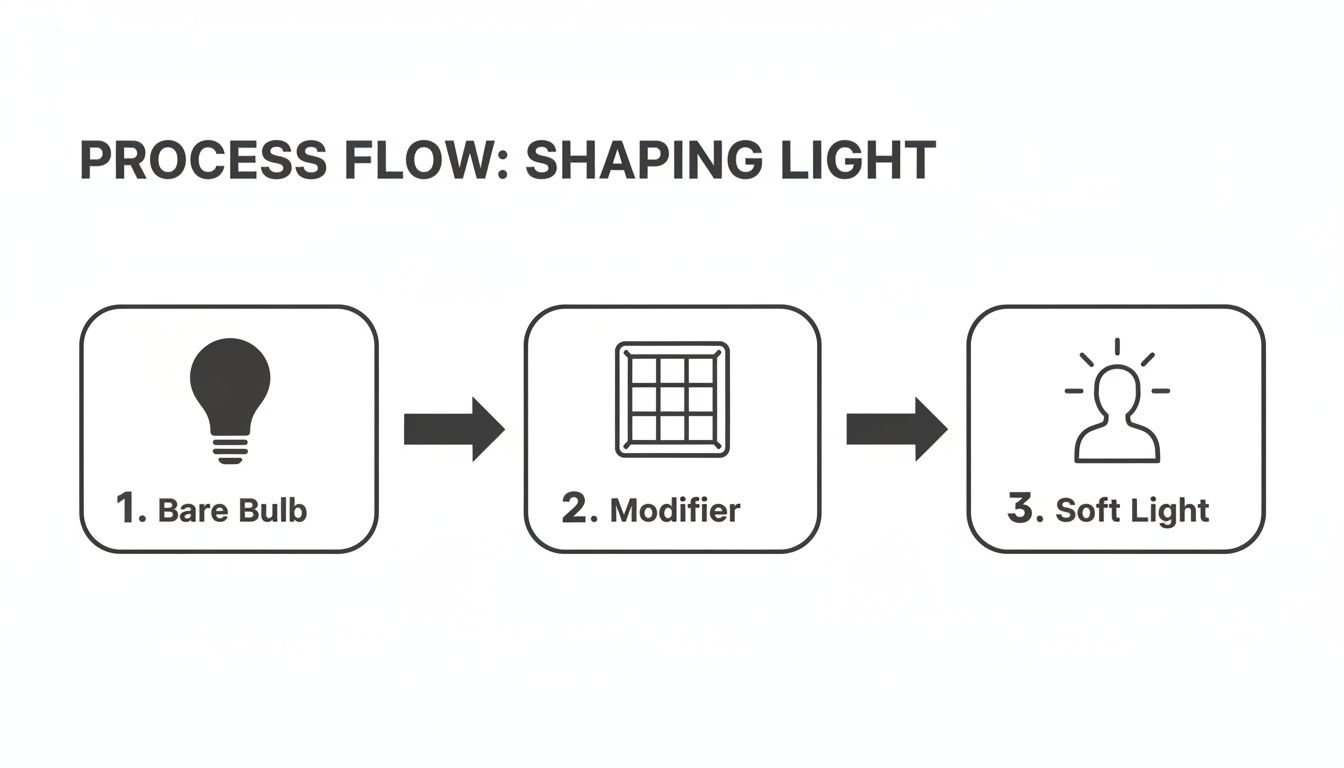
As you can see, the modifier is the essential bridge between a raw light source and a soft, professional result.
Mastering the One-Light Setup
You don’t need a truckload of gear to create stunning images. A single light, when paired with the right modifier, is an incredibly powerful and surprisingly versatile tool. Here are two ways to approach it.
1. The Simple Softbox for E-Commerce
For clean product photography or soft, dreamy portraits, a single large softbox is your best friend. Just place the light at a 45-degree angle to your subject, much like you would with a key light. The large surface area of the softbox creates a beautiful, wrapping light with soft, gentle shadows. Simple and effective.
Pro Tip: Want to soften the shadows on the other side of your subject even more? Grab a white foam board or a reflector and place it there. It will bounce some of the light back, acting as a passive fill light without needing another power source.
2. High-Contrast for Dramatic Portraits
To create a more dramatic, high-contrast look, you'll want a smaller or more focused light source like a beauty dish or a softbox with a grid. By moving the light further to the side of your subject (closer to 90 degrees), you'll create deep, sculpted shadows that really emphasize texture and form.
This technique is often called "Rembrandt lighting" when it creates that signature little triangle of light on the shadowed cheek. It's perfect for artistic portraits that need a strong, moody vibe.
Sample Lighting Recipe Cheat Sheet
Feeling overwhelmed? Don't be. Think of these setups as starting points or "recipes." You can follow them exactly or tweak them to taste. Here’s a quick cheat sheet to get you started.
Setup Name | Goal | Key Light Position | Recommended Modifier |
|---|---|---|---|
Clean Headshot | Flattering, professional, even lighting | 45° to the side, slightly above eye level | Large Octabox or Softbox |
Dramatic Portrait | Moody, high-contrast, sculpted look | 90° to the side (side lighting) | Beauty Dish or Gridded Stripbox |
E-commerce Product | Bright, clean, minimal shadows | 45° to the side, angled down | Large Softbox + Reflector |
Classic Rembrandt | Timeless, painterly, defined shadows | 45-60° to the side, high angle | Small Softbox or Umbrella |
These are just a handful of possibilities to illustrate the concepts. The best way to learn is to get in the studio and experiment. Move the light, swap the modifier, and see what happens
Buying vs. Renting Your Studio Gear
So, you've figured out what lights you need to bring your vision to life. Now for the big logistical question: should you buy your lighting gear outright, or is renting a better play?
There's no single right answer here. The best choice really boils down to your budget, how often you’re shooting, and what your long-term goals look like.
Buying your own gear is tempting. There’s a huge convenience factor in having everything you need sitting on a shelf, ready to go the moment inspiration hits. But that convenience comes with a hefty price tag—not just the initial investment, but also the ongoing headache of storage, maintenance, and the inevitable gear upgrades down the road. For a lot of photographers, that upfront cost is a massive barrier.
This is where renting completely changes the game. It gives you immediate access to top-tier, professional-grade equipment for just a fraction of the cost to own it. It’s the perfect way to experiment with different brands, play with powerful modifiers, and really hone your style without the long-term financial handcuffs.
Why Renting Might Just Be the Smarter Move
For creatives who are part of a shared hub like Freeform House, renting makes a ton of sense. It lines up perfectly with the kind of flexibility you need in today's creative world, giving you the power to scale your setup for any project that comes your way.
Think about the perks of renting:
Access High-End Gear: Need that $2,000 strobe or a specialty octabox for one specific shoot? Rent it without emptying your bank account.
Zero Maintenance or Storage Headaches: Use the gear, return it, and you're done. No need to worry about repairs, calibration, or finding a place to stash a giant softbox.
Try Before You Buy: Renting is the ultimate test drive. You can get a real feel for how different tools fit into your workflow before you commit to a major purchase.
Perfect for One-Off Gigs: Got a unique project with very specific lighting needs? Renting is way more cost-effective than buying a piece of equipment you might only use once a year.
Renting transforms your gear budget from a huge capital expense into a flexible operating cost. This frees up your resources, letting you invest more directly into your creative projects instead of tying up cash in equipment that sits on a shelf.
The global demand for quality studio lighting is exploding—it's projected to jump from USD 18.4 billion to a massive USD 41.99 billion by 2034. This surge is fueled by a growing freelance economy and the non-stop content demands of e-commerce. For photographers, tapping into rentals can slash setup time by up to 40% while providing access to the best tools on the market. You can read more about the trends shaping the studio lighting market to get a sense of where the industry is headed.
For anyone building a business, knowing how to leverage local resources is a superpower. If you’re expanding into audio, for example, check out our guide on finding a podcast studio rental near you for more practical tips.
Common Studio Lighting Questions Answered
Even after you’ve got the basics down, a few questions always seem to pop up when photographers first get serious about studio lighting. That's completely normal—there are a lot of moving parts. This section gets right to it, answering the most common queries we hear all the time.
Think of this as a final sanity check to firm up your knowledge before you walk into your next shoot.
What Is the Best All-Around Light for a Beginner?
For most photographers just starting out, a continuous LED light is the way to go. Because it’s always on, you see exactly how the light is hitting your subject in real-time. This makes learning about shadows, highlights, and angles so much more intuitive.
A single, powerful bi-color LED panel paired with a big softbox or umbrella is an incredibly versatile setup. It works beautifully for portraits, simple product shots, and even video, making it a fantastic and budget-friendly first move. This kind of setup gives you the best possible foundation for understanding how to really shape and control light.
How Many Lights Do I Actually Need for a Professional Setup?
While you might see complex commercial shoots using five or more lights, you can get stunning, professional results with just one to three. The idea that you need a massive, expensive kit right out of the gate is a total myth.
Here’s a practical way to think about it:
One Light: A single light with a great modifier can create beautiful, dramatic, and high-end portraits. It really forces you to master the fundamentals of light direction and quality.
Two Lights: Adding a second light (often as a fill to soften shadows or a rim light to create separation) introduces more depth and makes your subject pop from the background.
Three Lights: The classic three-point setup—key, fill, and rim—is the industry standard for that polished, clean look you see in professional headshots and video interviews.
My advice? Start with one quality light and a good modifier. Master it. Then, add more lights only when your creative vision demands it. This approach is also a much smarter way to scale your photography business without breaking the bank.
The number of lights doesn't determine the quality of the photo; the photographer's skill in using them does. A single, well-placed light will always outperform three poorly placed ones.
What Does Color Temperature Mean and Why Does It Matter?
Color temperature, measured in Kelvin (K), is just a way to describe how warm (orangey) or cool (blueish) a light source looks. Getting this right is critical for nailing accurate skin tones and true-to-life product colors.
Most studio lights are designed to mimic daylight (around 5600K) for a clean, neutral look. If you mix lights with different color temperatures in the same shot, you’ll end up with weird color casts that are a nightmare to fix in post. This is why bi-color LEDs are so popular—they let you adjust the temperature to match ambient light or get creative, giving you a ton of control.
Do I Need an Expensive Light Meter to Get Started?
Nope. A dedicated light meter is not necessary when you're starting out. Modern digital cameras have excellent built-in meters and live view screens that give you a surprisingly accurate preview of your exposure.
With continuous lighting, what you see on your screen is what you get in the photo. For strobes, just take a test shot, check your camera's screen and histogram, and adjust the power from there. You can absolutely start without one and think about adding it to your kit later if your work starts demanding that extra sliver of precision.
At Freeform House, we believe in empowering creators with the right tools and spaces to bring their visions to life. Free Form House is envisioned as a premier, membership-based club in the heart of Jenks, Oklahoma's 10 District downtown. Comparable to the renowned SoHo House, it offers more than just a social club. Members can take advantage of co-working spaces and a dynamic community hub designed for collaboration and connection. It's a central gathering spot aimed at fostering a creative and cooperative spirit within our local community. Discover a new way to connect, work, and create at https://freeform.house.
Comments