The Best Podcast Equipment for Beginners A Starter Guide
- Bryan Wilks
- Jan 23
- 13 min read

If you're just starting out, the best podcast equipment you can get is a quality USB microphone and a reliable pair of wired headphones. That’s it. This simple, direct-to-computer setup gives you excellent sound for a minimal investment, letting you focus on making great content instead of getting tangled up in technical jargon.
Your Path to Professional Podcasting Starts Here
Jumping into the world of podcasting is a thrill, but staring at the mountain of gear options can feel pretty overwhelming. The trick is to start with a solid foundation. Honestly, choosing the right core equipment is the single biggest step you can take toward creating a show that sounds polished and keeps listeners hooked from the very first minute.
The great news? High-quality audio is more accessible and affordable than ever. The podcast equipment market is absolutely booming, making it the perfect time for beginners in Jenks and Tulsa to get in on the action. Valued at $3.7 billion in 2025, this sector is expected to rocket to $7.2 billion by 2033, fueled by steady year-over-year growth. You can explore more market insights here.
This growth means you have more high-quality, budget-friendly options than ever before, so you can launch your show with confidence no matter your technical background.
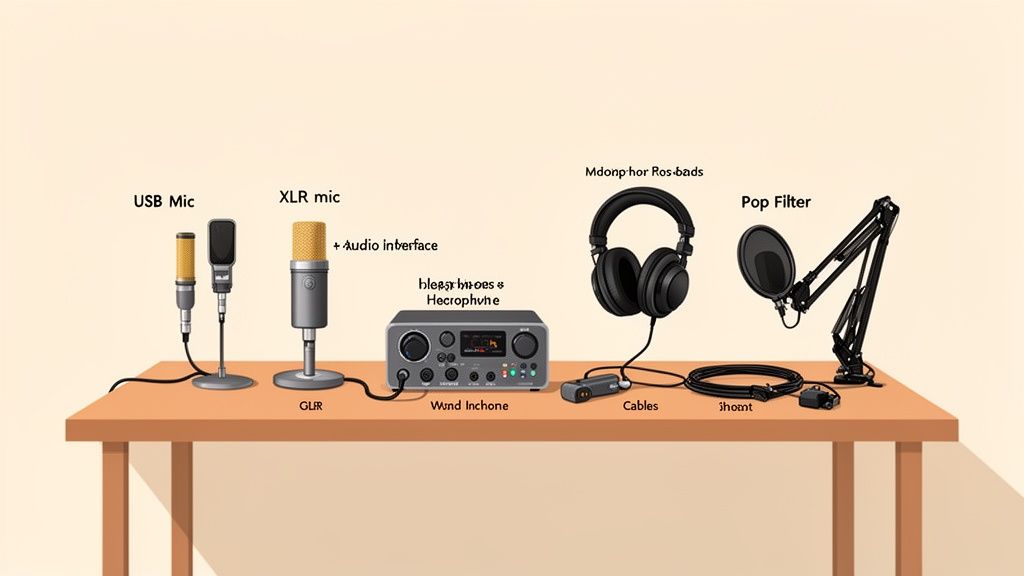
What Gear Do You Actually Need?
Before we get into specific models, let's clear the air. Your entire podcasting studio really just boils down to a handful of core components, and each one has a specific job. Once you understand their roles, building your kit becomes much less intimidating.
Here’s a quick overview of the essential gear every new podcaster should have on their radar.
Essential Podcast Gear At a Glance
We’ve put together a simple table to break down the must-have items for any beginner. Think of this as your starting checklist—the absolute essentials for getting your voice out there.
Equipment Category | What It Does | Beginner Priority |
|---|---|---|
Microphone | Captures your voice and turns it into a digital signal. | Critical. This has the biggest impact on your sound quality. |
Headphones | Let you monitor your audio in real-time to catch issues. | Essential. Prevents echo and ensures clean recordings. |
Audio Interface | Connects professional XLR mics to your computer. | Optional. You only need this if you choose an XLR microphone. |
Mounting | Holds your microphone steady (like a desk stand or boom arm). | Highly Recommended. Improves consistency and cuts down on handling noise. |
Getting these fundamentals right is the key. Once you're set up, you can start thinking bigger. For more on that, you might be interested in our guide on how to start a podcast business and turn your passion project into a real venture.
Understanding Your Core Podcasting Gear
Stepping into the world of podcast equipment can feel like learning a new language. You’ll hear terms thrown around like "USB," "XLR," and "audio interface," but don't let the technical jargon scare you off. The concepts behind the gear are actually pretty straightforward, and getting a handle on them is the first real step to picking the right tools for your show.
Think of it like choosing a car. You could go for a reliable, all-in-one sedan that gets the job done easily, or you could build a high-performance machine with specialized, customizable parts. In the podcasting world, a USB microphone is your sedan—simple, effective, and it just plugs right into your computer. An XLR microphone and audio interface combo is your performance system, delivering much higher quality and room to grow.
The Great Debate: USB vs. XLR Microphones
For anyone just starting out, a quality USB microphone is almost always the right move. All the tech it needs is built right inside the mic itself, turning your voice into a digital signal your computer can understand instantly. You just plug it in and hit record. That simplicity is its superpower.
XLR microphones, on the other hand, are the professional standard you see in recording studios. These mics capture a richer, more detailed analog signal, but they need a separate piece of hardware to talk to your computer. That’s where the audio interface comes in.
An audio interface is basically a translator. It takes that high-quality analog signal from your XLR mic and converts it into a digital format for your computer, giving you way more control over the final sound.
This separation of duties is precisely why XLR setups sound better. It lets each component do one job and do it really, really well. This leads to cleaner recordings and gives you the freedom to upgrade one piece at a time as your podcast evolves.
The Unsung Heroes of Your Setup
Beyond the microphone, a few other pieces of gear are absolutely non-negotiable if you're chasing that polished, professional sound. They might not get all the glory, but they make a massive difference.
1. Audio Interface: Like we mentioned, this is the essential bridge for any XLR mic. An interface like the Focusrite Scarlett Solo is incredibly popular for a reason—it’s reliable, dead simple to use, and delivers clean, consistent power to your mic.
2. Closed-Back Headphones: You have to wear headphones while you record. It’s the only way to hear exactly what your mic is picking up in real-time, letting you catch annoying background hums or notice if you’re speaking too loudly. Closed-back headphones are key because they seal around your ears, preventing the sound from leaking out and getting picked up by your mic, which would create a weird, distracting echo.
3. Microphone Stands and Pop Filters: A stable mic is a happy mic. A basic desk stand or a more flexible boom arm will keep your microphone perfectly positioned and stop it from picking up vibrations from you bumping the table. A pop filter is that little screen you see in front of studio mics; it’s designed to soften the harsh, punchy sounds from "P" and "B" words (we call those "plosives"), making your audio much smoother for the listener.
With over 4.5 million podcasts out there, audio quality really matters. Listeners, who tune in for over seven hours a week on average, can spot a bad recording from a mile away. Investing in a solid foundation—like the classic Shure SM58 microphone and a Focusrite Scarlett Solo interface, a go-to combo for over 40% of new creators—ensures your message actually gets heard. To dig deeper into what's happening in the podcast world, you can learn more about the latest podcasting trends from Riverside.fm.
Building Your First Podcast Studio on Any Budget
Diving into podcasting doesn't mean you have to drain your bank account. You can actually pull together a fantastic setup that delivers clean, professional-sounding audio, no matter what your budget looks like. The real secret is picking gear that gives you the most bang for your buck based on your goals.
To make it easy, we've mapped out three complete starter kits for different price points. Think of these as a clear roadmap, helping you grab the right equipment without all the guesswork. You can start small, put out a great show, and then upgrade pieces as your podcast grows.
Comparing Beginner Podcast Kits
So, what's the big difference between these budget tiers? It mostly comes down to moving from a simple USB microphone to a more professional XLR setup that uses an audio interface. As you go up in price, you also get better headphones and sturdier mounting gear, which really helps smooth out your workflow and keep your audio crisp.
The biggest jump in sound quality almost always comes from the microphone itself. Putting just a little more money into a solid mic and interface can take your audio from "pretty good" to "wow," leaving a much stronger impression on your listeners.
This infographic lays out the three core pieces of gear that form the foundation of any podcasting kit.
As you can see, your microphone, interface, and headphones all work together as a team to capture your voice, process the signal, and let you hear exactly what your audience will.
To give you a concrete shopping list, we put together a side-by-side comparison of three sample kits, complete with some well-respected product examples.
Beginner Podcast Kit Comparison
Kit Level | Example Gear | Estimated Cost | Best For |
|---|---|---|---|
Bare Essentials Kit | Samson Q2U (USB/XLR Mic), Included Desk Stand, Wired Earbuds | Under $150 | New podcasters who want to test the waters with a simple, reliable, and high-value setup. |
Creator's Mid-Tier Kit | Rode PodMic (XLR), Focusrite Scarlett Solo, Audio-Technica M20x Headphones, Desk Boom Arm | $300-$500 | Committed creators who want superior audio quality, flexibility, and a more professional recording experience. |
Aspiring Pro Kit | Shure SM7B (XLR), Audient iD4 MKII Interface, Sony MDR-7506 Headphones, High-Quality Boom Arm | $500+ | Podcasters aiming for studio-grade sound from day one and who want gear that will grow with them. |
Ultimately, the right choice boils down to your ambition and your budget. The Bare Essentials Kit is more than enough to produce a fantastic podcast. But if you're serious about creating content for the long haul, the Creator's Mid-Tier Kit offers a major leap in quality and control for a pretty modest price jump.
For those in Jenks and Tulsa looking to skip the shopping altogether, you can get hands-on with pro-level gear by exploring a podcast studio rental near you. It’s a great way to access incredible equipment without the upfront cost.
Elevating Your Sound Beyond the Microphone
A great microphone is a huge step toward professional audio, but it’s only one piece of the puzzle. The other, equally important piece is what happens in your recording space and on your computer. Your environment sets the stage for your raw audio quality, and your software gives you the power to polish it into a final, impressive product.
Think of your podcast software—often called a Digital Audio Workstation (DAW)—as your digital editing suite. This is where you’ll snip out mistakes, weave in your intro music, and make sure everything sounds balanced and professional. For beginners, the good news is you don’t have to break the bank; many fantastic tools are completely free.
Choosing Your First Recording Software
You can get professional-sounding results without spending a dime. In fact, some of the best podcast software for beginners might already be on your computer or just a quick download away.
Audacity: This is the workhorse of the free podcasting world. As an open-source tool, it's beloved by the community for its powerful features and compatibility with any operating system. The interface can feel a bit old-school, but it gets the job done.
GarageBand: If you're using a Mac, you're in luck. GarageBand is a fantastic, user-friendly starting point with an intuitive design and everything you need for high-quality recording and editing.
Descript: For those willing to invest a little, Descript takes a totally different approach. It transcribes your audio into text, and you edit the audio by simply editing the words on the screen. It can be a massive time-saver.
The secret that separates amateur podcasters from the pros isn't the price of their microphone—it's how well they control their recording environment. Great gear in a bad room will always sound worse than basic gear in a great room.
The podcasting boom has brought a flood of great tools to the market, making it easier than ever to get started. With the home audio market projected to hit $27.2 billion in 2025 and over 73% of US adults listening to podcasts, the demand for clear, professional sound has never been higher. You can find more illuminating podcast statistics on Marketing LTB.
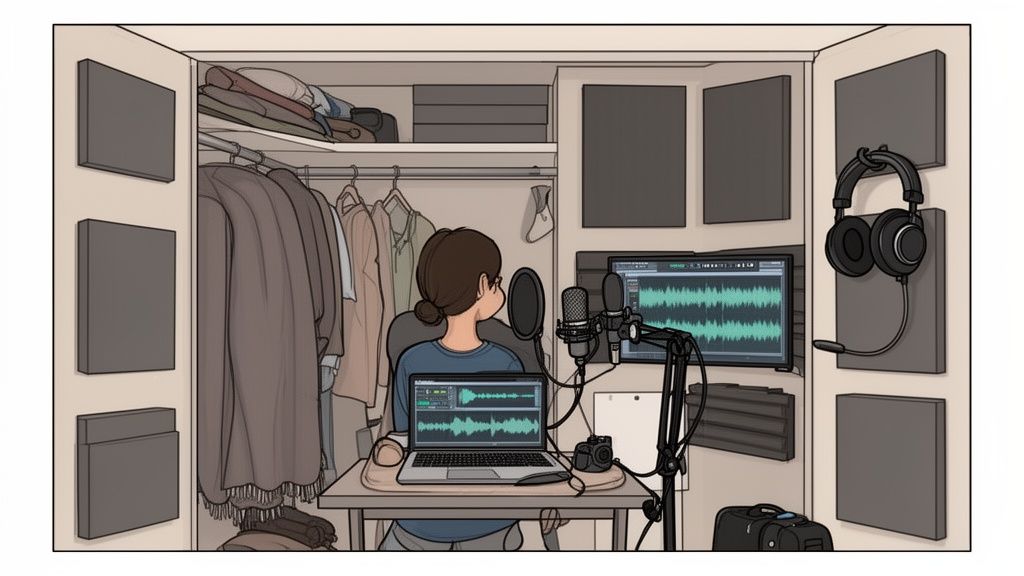
Mastering Your Space with Acoustic Treatment
Before you hit record, just take a look around the room. Hard, flat surfaces are your audio's worst enemy—think bare walls, hardwood floors, and big windows. These surfaces bounce sound waves all over the place, creating that echoey, distant, and unprofessional sound we call reverb.
Acoustic treatment is simply the art of stopping those reflections. And no, you don't need to line your walls with expensive foam panels. The best solutions are often already lying around your house.
You can turn almost any room into a makeshift vocal booth with these simple, no-cost hacks:
Record in a walk-in closet. This is a classic for a reason. All those clothes act as natural sound dampeners, absorbing reflections and giving you a surprisingly clean, studio-like sound.
Lean into soft furniture. Find a room with a big couch, a thick area rug, and heavy curtains. All these items do a fantastic job of soaking up stray sound waves that would otherwise create echo.
Build a pillow fort. It sounds silly, but it works! Surrounding your microphone with a few pillows or draping heavy blankets over some chairs can dramatically cut down on reverb and clean up your audio.
By taking a few minutes to control your recording environment, you make sure your microphone is capturing your voice—and only your voice—with the crispness and clarity it deserves.
A Smarter Way to Podcast in Jenks and Tulsa
Putting together a solid beginner podcast setup takes time, money, and a whole lot of trial and error. For busy entrepreneurs and creators right here in Jenks and Tulsa, there’s a much more direct path to launching a high-end show without the headache of buying and managing your own gear.
Instead of turning your office or closet into a makeshift studio, what if you could just step into a professional environment built for one thing: capturing incredible audio? This approach lets you skip the entire equipment maze and gives you immediate access to broadcast-quality tools from day one.
Your All-In-One Podcasting Solution
At Freeform House, we’ve cleared the path between your great idea and a polished final product. Our members get access to a fully equipped, in-house podcast studio designed to deliver professional results with zero fuss. As a premier, membership-based club in the heart of Jenks, Oklahoma's 10 District downtown, we offer more than just a social club. Members can take advantage of co-working spaces and a dynamic community hub designed for collaboration and connection.
Imagine this: You book the podcast booth, walk in with nothing but your notes, and hit record. No troubleshooting. No setup. No compromising on audio quality.
This is the real advantage of using a dedicated space. Our studio is acoustically treated to capture clean, crisp audio, free from the echo and background noise that plagues so many home recordings. It’s the perfect setup for anyone who values their time and wants to focus 100% on creating can't-miss content.
Access Professional-Grade Gear Instantly
Our podcast booth comes with everything you need to produce a show that sounds like it was recorded in a major studio. We’ve handled all the technical stuff so you can just focus on the conversation.
Members have access to:
Professional Microphones: Use industry-standard mics that capture rich, detailed vocal tones.
High-End Audio Interfaces: Our equipment ensures your audio is processed cleanly for that polished, professional sound.
Mixers and Headphones: Easily manage multiple speakers and monitor your audio with perfect clarity.
This makes Freeform House more than just a place to work—we’re a strategic partner in your creative journey. If you’re exploring different production options in the area, you can also check out our guide on the top Tulsa recording studios to see how our in-house solution offers a unique blend of convenience and quality. We're here to help you create amazing content with total confidence.
Got Questions About Podcast Gear? Let's Clear Things Up.
Diving into podcast equipment for the first time can feel like learning a new language. You’ve got a dozen tabs open, everyone has a different opinion, and it’s easy to feel completely stuck.
This is where we cut through the noise. Here are some straightforward, no-nonsense answers to the questions we hear most often from people just starting out. We’ll tackle the big debates (like USB vs. XLR) and point out the common slip-ups you can easily avoid. Think of this as your quick guide to getting over those first few hurdles with confidence.
Do I Really Need an Audio Interface, or is a USB Mic Enough?
Honestly, for pure simplicity, a good USB microphone is a brilliant place to start. You just plug it straight into your computer, and it handles everything on its own. It's the perfect all-in-one solution if you're a solo host who just wants to hit record and start creating.
But, if you're thinking long-term, an audio interface paired with an XLR microphone delivers noticeably better sound quality and, more importantly, gives you room to grow. This kind of setup puts you in control, opens the door to a massive range of professional mics, and makes it easy to add a co-host or guest later on.
A USB mic is like a reliable sedan—it gets you where you need to go with zero fuss. An XLR and interface setup is more like a customizable rig; you start with a solid engine and can upgrade the tires, suspension, and everything else over time to boost performance.
What's the Biggest Audio Mistake Beginners Make?
The single most common mistake new podcasters make isn't about the gear they buy—it's that they completely forget about the room they're recording in. People will drop hundreds of dollars on a fantastic microphone only to set it up in a big, empty room with bare walls and hardwood floors.
All those hard surfaces create an echoey, cavernous sound that instantly screams "amateur." Before you even think about buying acoustic panels, just try recording in a smaller room filled with soft things. A walk-in closet packed with clothes is a podcaster's secret weapon; it's basically a free, ready-made vocal booth.
Fixing your room's sound will make a $100 mic sound like a $500 one.
How Much Should I Actually Spend on My First Podcast Setup?
You can get going for a lot less than you probably think. A solid "Bare Essentials" kit, built around a versatile USB mic like the Samson Q2U and free recording software, can cost you less than $150. That’s more than enough to produce a clean, professional-sounding show.
For creators who are ready to commit a bit more, a budget of around $300-$500 is a common sweet spot. This usually gets you into the world of XLR microphones, a dependable interface like the Focusrite Scarlett Solo, and a decent pair of closed-back headphones. The key is to put your money into your microphone and your room first—they make the biggest difference. You can always upgrade the other stuff later.
Can I Record a High-Quality Podcast on Just My Phone?
Absolutely. Using your smartphone is a fantastic way to start with a zero-dollar equipment budget. The microphones in modern phones are surprisingly capable, but the trick is to control your environment.
To get the best possible sound, try these tips:
Find a small, quiet space like a parked car or a closet. This will cut down on background noise and reverb.
Use an external lavalier mic that plugs into your phone. It's a cheap upgrade that makes a huge difference.
Keep the phone steady and at a consistent distance from your mouth so the volume doesn't jump all over the place.
While a phone is a great entry point, dedicated podcasting gear will give you that noticeable leap in quality that listeners really appreciate.
At Freeform House, we take the guesswork out of the equation. As a central gathering spot aimed at fostering a creative and cooperative spirit within our local community, we help members in Jenks and Tulsa skip the gear-buying headache and step right into our professional, acoustically treated podcast booth. You get access to studio-grade equipment, so you can focus on making great content while we handle the tech. Learn more about how we support local creators by visiting https://freeform.house.
Comments