Setting Up a Workshop in a Small Space: A Practical Guide

A facilitator arrives with a polished agenda, a box of sticky notes, and a room that looked roomy in the booking photos. Then the chairs go in. The screen lands behind the brightest window, the catering table pinches the entrance, and there's nowhere to park materials without blocking the route between seats. The room isn't too small for the workshop. It's set up for the wrong work.
That's the challenge of setting up a workshop in a small space. Success depends less on how many chairs fit than on whether people, equipment, materials, and activities can coexist safely and comfortably. For a makerspace, that means planning around tools and work surfaces. For an executive offsite or creative session, it means balancing sightlines, movement, power, and opportunities for participants to contribute.
Why Small-Space Workshops Need a Different Playbook
A compact room can look tidy while it's empty and feel crowded as soon as the session starts. Participants need space to sit, stand, handle materials, and move between activities. Facilitators need a clear route to the screen and enough room to reach each group. Add a demo station or catering setup, and the available working area changes again.
That's why capacity is a workflow question, not a chair count. MIT makerspace guidance recommends reserving approximately 10 square feet for a limited tool set and up to 50 square feet for a broad variety of tools, while also allowing for safe movement and nearby work surfaces (MIT makerspace setup guidance). Those figures are useful planning references, not a promise that a given room will fit a specific group. Tool size, material handling, circulation, and simultaneous users all affect what the space can support.
Plan for what happens at the same time
A room might have enough floor area for a group activity and a materials table, but not enough clear space for people to use both at once. That distinction matters in a hands-on session: a line of participants waiting to use one station can block the aisle, while materials left on chairs turn seats into storage.
Start by listing the activities that need to happen together. If one person demonstrates while others watch, arrange the room for visibility. If everyone needs to make something at once, plan for work surfaces and movement before you decide how many seats to set out.
Practical rule: If participants must squeeze past a working table to reach their seats, the room is already over capacity for that layout.
Treat the room as a working environment
The same mindset applies to a professional workshop or offsite. The room has to support the agenda, not just look impressive in a photo. A boardroom arrangement might suit a focused discussion, while a hands-on session may need open work surfaces and a staging area instead.
Good small-space design protects both attention and access. When people can see the facilitator, reach the materials, and move without disrupting others, a compact room can feel purposeful rather than cramped.
Measuring the Room Before You Move a Single Chair
Measure first, then make a furniture plan. A quick sketch on paper is often enough to catch a blocked doorway, awkward screen position, or workbench that leaves no usable aisle. Don't rely on a room photo alone. Photos rarely show door swings, outlets, or the space needed to carry materials through the room.
Make a plan you can reuse
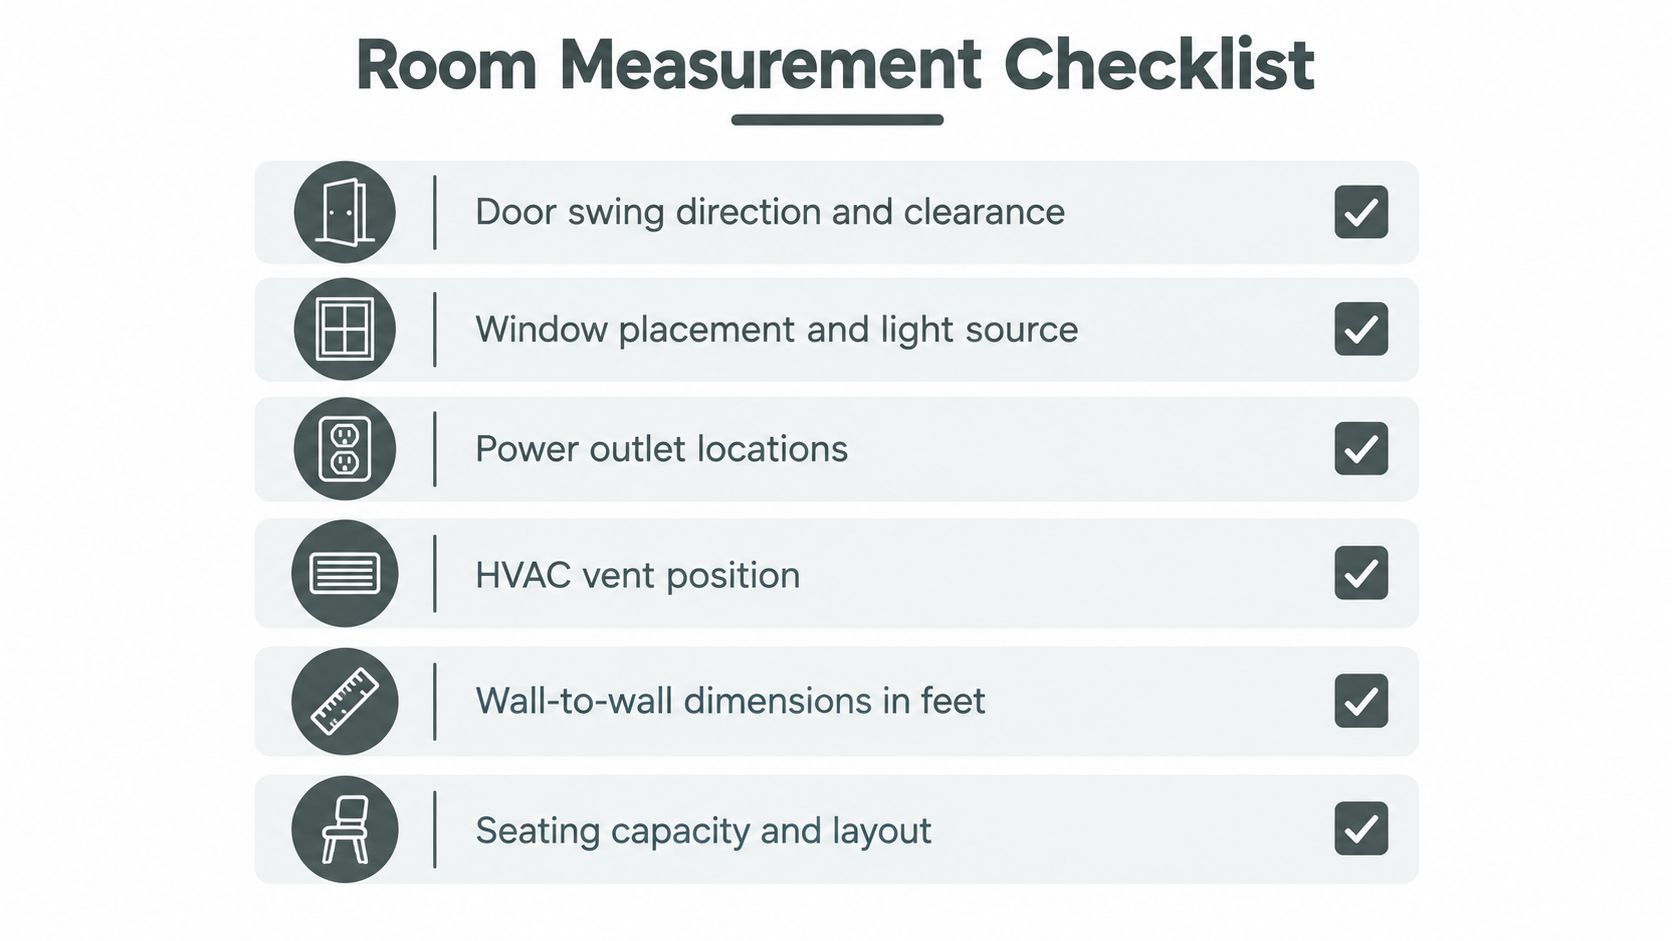
Sketch the room as viewed from above. Record the fixed features first, then add furniture and working zones.
Mark openings and clearances. Draw each door's swing, note window positions, and identify the direct route to the exit.
Record utilities. Mark outlets, HVAC vents, and any fixed equipment so tables and storage don't block access.
Measure the walls and ceiling. Note wall-to-wall dimensions and ceiling height, especially if you're considering vertical storage.
Add a circulation route. Practical small-workshop guidance recommends a clear aisle of at least 30 inches, a primary bench 24 to 36 inches deep, and eye-level storage around 48 to 52 inches above the floor. Adapt those starting points to the equipment, materials, and people who'll use the room (compact workshop layout guidance).
Mark the proposed screen wall on your sketch. Check where natural light comes from and whether it will wash out the display. A wall that seems convenient when the room is empty may be a poor choice once people are seated.
Check the plan against the activity
Now draw the furniture and equipment footprints. Include chairs pulled back from tables, a presenter's standing area, and space for materials to arrive and leave. If the workshop involves long pieces of stock, map their path through the doorway and around the machines before you settle on a layout.
Finally, write a one-line capacity note: intended activity, planned seats, equipment or catering to be added, and any clearances that must remain open. A room that works for a small discussion may need a different plan for a demonstration. Let the agenda set the headcount, not the number of chairs you can squeeze in.
Choosing the Right Layout for Your Agenda
The best layout makes the most important interaction easy. A room arranged for discussion should support eye contact. A room arranged for instruction should give participants a useful view of the demonstration or screen. And if people need to move materials between stations, aisles matter more than a symmetrical chair plan.
Three setups tend to work well in compact rooms. Each has a trade-off, so choose based on the agenda rather than how the room will look in a photo.
Layout | Best Headcount | Facilitator Movement | Screen Visibility | Best For |
|---|---|---|---|---|
Boardroom | A small group around one table | Limited around the table | Good if everyone faces the display | Executive discussion and decisions |
Classroom-aisle | A group in rows with a clear aisle | Strong down the aisle and at the front | Usually strong when seats face forward | Presentations and guided training |
U-shape | A small group facing inward | Good through the open end and inside space | Works when the display is at the open end | Discussion with a facilitator-led focus |
Treat the headcount descriptions as relative, not fixed limits. A table's dimensions, chair size, room shape, and need for work surfaces all change what will fit. Before committing, use the floor plan to test where the facilitator stands and how people enter, exit, and take part.
Choose the layout that supports the work
A boardroom plan keeps conversation centered on the table, but it can leave the facilitator boxed in and make hands-on activities awkward. Classroom seating improves forward visibility, but participants may talk mainly to the front instead of each other. A U-shape invites discussion and gives the facilitator access to the group, though it uses more perimeter space than rows.
The common mistake is choosing the arrangement that looks most polished in a marketing photo. If the facilitator has to turn away from half the group to advance a slide, or participants can't see the demonstration, the layout is working against the session.
For a closer look at how different arrangements serve different meetings, compare these meeting room layout options. Then test the plan in the actual room, with the chairs and tables in place.
Wiring Power, Audio, and Display Without Trip Hazards
A room isn't ready just because the laptop connects to the screen. Power, cables, audio, display position, and lighting all need to work together without crossing the paths people use. Set up in a consistent order so you can find problems while the room is still empty.
Set the technical layout before people arrive
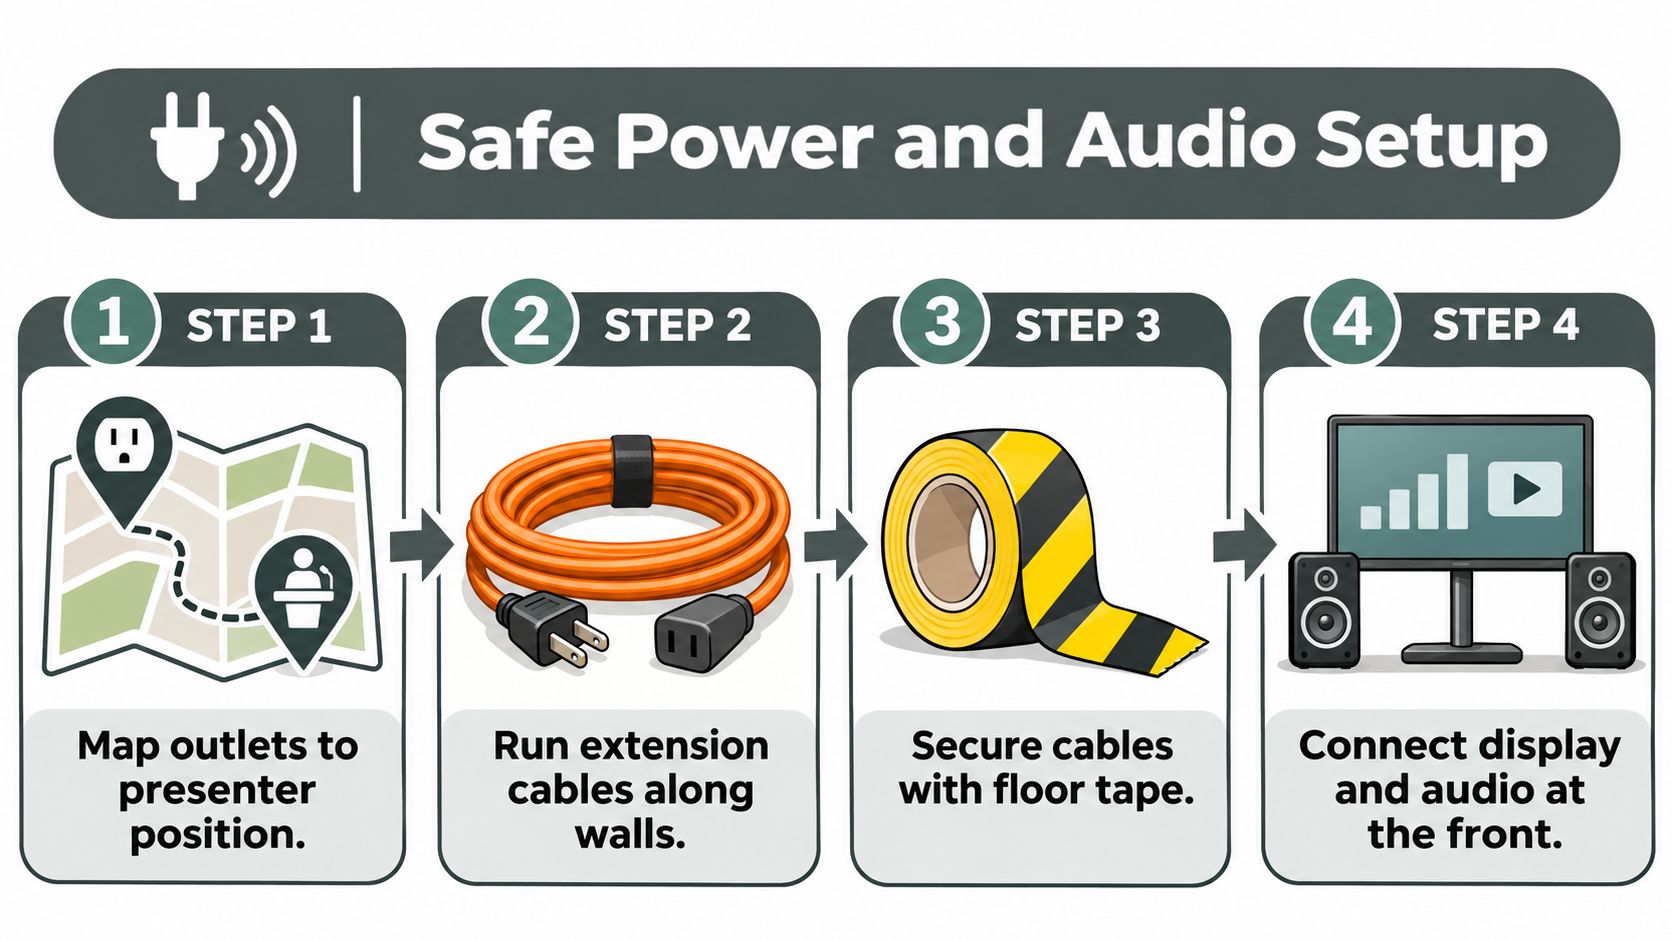
Start with the presenter's position and the display wall. Place the screen where daylight won't wash it out, then check that seated participants can see it without twisting around furniture. Map the nearest suitable outlet to the presenter's laptop, display, and any audio equipment.
Run extension cables along walls, not through aisles. Where a cable must cross a walking route, secure it with suitable floor tape and check that it can't lift or shift underfoot. Don't hide a cable under a rug or leave an improvised loop beside a chair.
Use a powered speaker only where it can serve the whole room without being turned up unnecessarily. If you're using a wireless lapel or handheld microphone, test it while walking through the area where the facilitator will move. Play a recording or speak into the mic from the furthest seat, not from beside the speaker. That's where unclear audio tends to become obvious.
Balance screen time with working light
Dim overhead lighting only if participants can still read and write. A warm task light on tables can keep notes legible while the display remains visible. Research on coworking spaces associates bright lighting and worktables positioned near windows with greater satisfaction, communication, and collaboration, and office plants with motivation, productivity, well-being, and satisfaction (research on coworking space design features).
Before doors open, test the laptop connection, sound, screen visibility, and room lighting from several seats. In-house AV, such as the setup available in rooms like the Executive Room at Freeform House, can make the technical check easier for a visiting facilitator. For a wider checklist, use this guide to conference room technology.
Safety and Air Quality You Cannot Afford to Skip
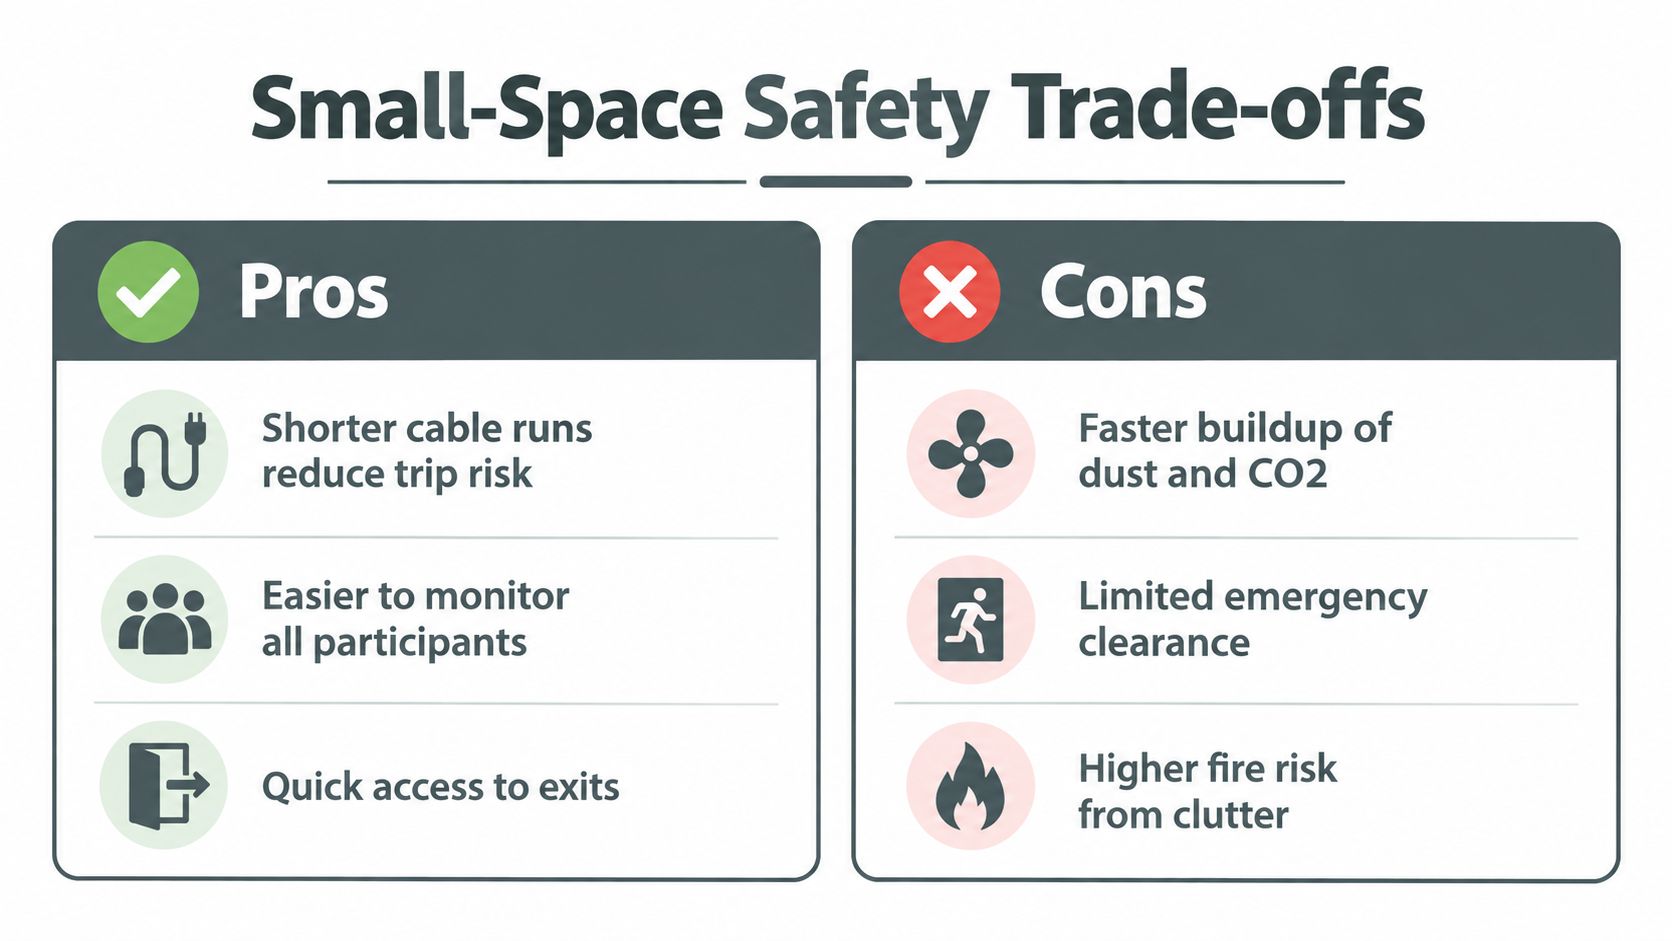
Storage can make a compact room feel orderly, but it can't compensate for poor ventilation, unsafe equipment placement, or a blocked exit. In a small workshop, a saw, soldering station, heater, charger, and solvent cabinet can compete for the same air, power, and clearance. Treat the way those activities interact as a layout issue from the start.
Work through the hazards before arranging storage
Begin with the processes, not the furniture. Identify which tools produce heat, sparks, fumes, or dust. Separate heat-producing equipment from sawdust, paper, textiles, solvents, and packaging. Keep electrical panels and exits clear, and place visible, accessible fire extinguishers where people can reach them without crossing an active work area.
For any wood-cutting, sanding, or machining, plan dust extraction at the tool. OSHA identifies local exhaust ventilation as the primary control method for wood dust, and gives a target duct air velocity of approximately 2,500 to 4,000 feet per minute to move light sawdust, chips, and shavings without plugging (OSHA wood dust guidance). In practice, put the collection hood as close as practicable to the emission point, keep flexible hose runs and sharp bends to a minimum, and size the system for the machines expected to operate at the same time.
Don't count a clean-looking floor as proof that the air is safe. A collector with a clogged filter, closed blast gate, or poorly placed hood can leave dust in the room even when surfaces look tidy. Specify appropriate filtration and a disposal route, then inspect the system and check airflow or static pressure at the tool furthest from the collector.
Protect circulation and escape
Keep a direct exit route open throughout the session, including during setup and cleanup. Don't allow temporary stock, folding tables, or waste bins to take over that space. Store heavy items low, and secure blades, chemicals, and sharp tools in dedicated drawers or lockable cabinets.
A clever storage wall is useful only if people can still reach the exit, the electrical panel, and the equipment they need.
Small rooms reward discipline, but they don't forgive shortcuts. If the work involves hazards that the available room cannot control, change the process or use a more suitable workspace instead.
Facilitation Techniques That Keep Small Rooms Engaged
In a compact room, participants feel the difference between being included and being talked at. Keep instructions concise, give people something useful to do, and avoid activities that require a major furniture reset every time the agenda changes.
Use participation patterns that don't need extra space
A round-robin opening gives each person a way into the conversation before the discussion settles around the most confident voices. Ask for one concise response from each participant, such as a priority or a question they want the session to answer. This works especially well when people are seated around one table or in a U-shape.
For breakouts, pair people or form groups of three at their existing tables. Give each group a specific task and a way to report back, such as one recommendation or one unresolved question. Small groups can produce focused work without scattering participants into aisles or competing for another room.
Sticky-note voting lets everyone contribute before the room moves into debate. Ask participants to write ideas and post them on a wall or board, and then cluster or vote on the themes. That sequence gives people time to think before the fastest speaker sets the direction.
Build movement into the agenda
A change of activity can refresh attention without turning the room upside down. Use a short demonstration, a standing discussion at a wall-mounted whiteboard, or a quick regroup around a flip chart. When the room has access to distinct settings, moving from focused work to a more informal conversation can also mark a clear shift in the session.
For more options to adapt to different groups, browse these workshop activity ideas. Whatever the exercise, explain the task, the available space, and the expected output before people start moving. Clear instructions reduce congestion and help quieter participants contribute without having to compete for the floor.
A Reusable Run Sheet From Arrival to Follow-Up
The simplest way to protect a small-room session is to make setup and transitions part of the plan. A reusable run sheet keeps decisions visible when the room is busy and helps everyone involved know what must stay clear.
Before the event
Two weeks out: Confirm the headcount, agenda, preferred layout, equipment, and catering plan. Ask whether the group will need demonstration space, material storage, or an activity that changes the seating arrangement.
One day out: Walk the room or review a measured plan. Mark furniture positions, check exit access, and test the display and audio if possible.
Two hours before: Set up registration, place materials, connect the display, and brief anyone handling catering or equipment. Keep service tables and supplies out of operating and exit paths.
During the session
Welcome participants at the entrance, explain the agenda, and point out the locations of materials and facilities. Before each activity, tell the group where to move and what they'll need. Clear away materials that the next block won't use, rather than letting tables gradually become storage.
Keep a short troubleshooting plan at hand. If daylight washes out the screen, adjust the blinds or move the display before people settle in. If the microphone feeds back when the speaker turns, reposition the speaker or change where the presenter stands. If catering blocks the emergency exit, stop setup and relocate the table. None of these problems improves because the room fills up.
After the event
Send notes, photos where appropriate, and next actions within 48 hours. A 2025 study comparing remote workers' environments reported higher well-being, work engagement, and productivity outcomes for community-based coworking than working from home. Within coworking settings, face-to-face collaboration was significantly associated with higher well-being and engagement, though its effect on productivity wasn't statistically significant (the 2025 coworking and remote-work study). A productive gathering needs more than people sharing a room; useful follow-up gives the conversation somewhere to go.
Freeform House is envisioned as a premium, membership-based club in the heart of Jenks, Oklahoma's 10 District downtown. Comparable to the renowned Soho House in its members-club approach, it offers more than a social club, with coworking spaces and a community hub designed for collaboration and connection. Visit Freeform House to explore its rooms and plan a workshop where thoughtful setup, modern functionality, and a cooperative local spirit can work together.
Comments